Shop is now open!

The Mechanics of Throwing - Part 1
Exploring the physics behind wheel-thrown pottery
9/1/2025
This one is for my fellow potters who want to make larger pieces on the wheel. For those who enjoy pushing clay to its limits, in height, width, and thinness. For those who seek the challenge. We’re going to nerd out. Are you ready to nerd out?
For some time now, in my eternal quest to improve my cylinders, I have had thoughts swirling around in my head. Dark thoughts. Engineery thoughts. And I figured it was about time I organized everything into a long-winded post.
Throwing taller and larger mainly comes down to the quality of your cylinder, and part of understanding this is understanding what makes a cylinder strong, what makes it weak, what stresses it out, and how to minimize it. I’m going to walk through some basic structural mechanics of throwing larger cylinders. It will be technical, but hopefully approachable. If it's too much, you can always skip down to the takeaways.
Is this going to make you a better potter? Undoubtedly. You can always trust what you read on the internet. At a minimum, I hope this gives you a more nuanced appreciation for what goes into a large, beautiful vase: a high quality cylinder.
Let’s start with stress. Very relatable. We all have it and use pottery as a means to get rid of it. We take our stress out on the clay. Literally.

This is a simple equation for stress (σ). It's Force (F) divided by Area (A). Stress is also the same as pressure. For example, you might be familiar with pressure like PSI, which stands for Pounds per Square Inch. Pounds are a force, and they are being divided by square inches, an area. For you metric peoples, Newtons per square meters gives you Pascals (Pa).
And guess what? When a lump of wedged clay is placed on the wheel, F is just its own weight, pushing down on itself. It doesn’t move because it’s able to hold itself up. But then you start centering and apply additional force with your hands. When the pressure you apply is greater than the clay’s ability to resist, it will yield, deforming under the force of your hands. From this equation, you can see that the larger the area you use to push, the greater the force required to produce the same stress. This is why when centering, it’s easier to move the clay using only the heel or edge of your palm, or sometimes your fingertips. A smaller applied area results in greater stress on the clay.
Let’s go deeper down the rabbit hole. Once the opening is complete and you start pulling your cylinder, things get a bit more complicated. Unlike during centering, imperfections are not easily eliminated. Any flaws or defects during this stage will almost certainly be permanent and cascading. These flaws could have come from many places: the clay out of the bag, the wedging process, the centering and opening, the cylinder pulling, a loose-fitting bat. Or even a mosquito biting you (this unfortunately happened to me just two weeks ago).
(1)

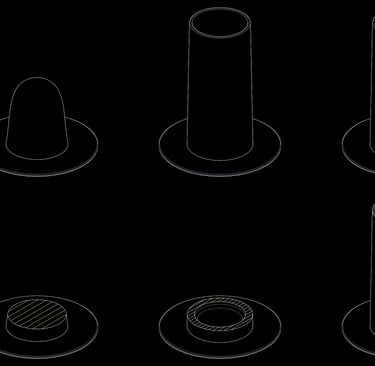
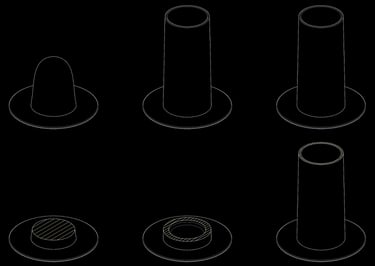
At the cylinder stage, the center has been hollowed out and the clay mass is now held up with thin walls. The force, or weight of the clay, has not changed, but the cross-sectional area holding it up has gotten much smaller, from a filled-out circle to a hollow, thin ring. This smaller area means more stress. Some things to observe at this point: assuming each cylinder pull is perfect, the clay will still eventually stop rising with each pull. This is because the walls are no longer thick enough or strong enough to support the weight. It slumps down upon itself after it leaves your fingers. It has reached its limit and any further attempt is an exercise in futility. Notice also that the bottom of the cylinder wall is thicker than the top. This is natural, because the bottom of the wall needs the larger area to hold up the larger weight of clay above it. The clay near the top of the wall supports much less weight, so it will be thinner as a result. The picture below illustrates the difference in cross-sectional area between centered lump, cylinder bottom, and cylinder top. If you have a cylinder whose walls are the same thickness from top to bottom, that’s telling you that the clay has not yet reached its limit.
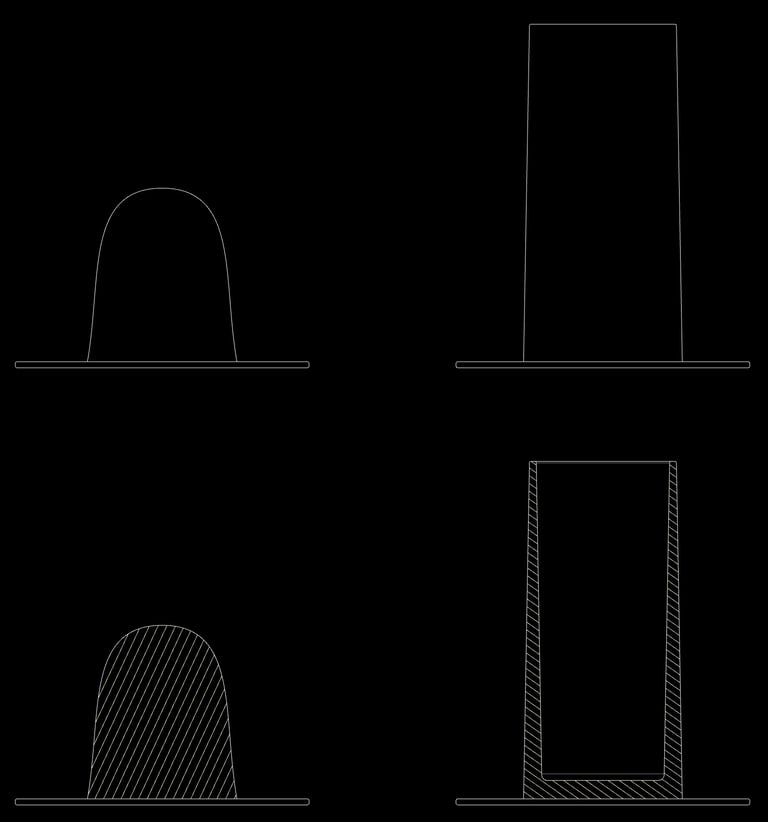
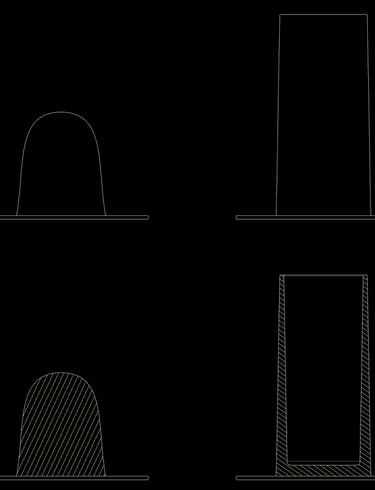
The ideals: centered hump, perfect cylinder
Comparing cross-section areas
Of course, this is all assuming a cylinder without imperfections or defects. In reality, you are a flawed, mortal human, and will you impart your human flaws into your cylinder. These imperfections – areas that are thinner, wetter, or off-center – will increase the risk of buckling as you throw. Buckling is a sudden, uneven, and usually catastrophic deformation that occurs in thin-walled structures. Think of crushing a soda can or shoving your feet into shoes without using your hands. It buckles at the weakest point, resulting in a crumpled heap. A perfect cylinder will yield and slump under its own perfectly centered weight, but an imperfect cylinder will buckle, folding upon itself. And you know what? There’s an equation for that. It’s the same as before, but the force F changes to something called Euler’s buckling load. Let’s call it Fbuckling.
(2)
where:
E is the stiffness of the clay material, not related to its shape
I is the stiffness of the clay shape, not related to its material
K is the effective height factor of the cylinder, which is 2 for our purposes
H is the height of the cylinder
For simple thin-walled cylinders, we have the following equations:
where:
Do is the outer diameter of the cylinder
Di is the inner diameter of the cylinder
(3)
(4)
Now, let’s plug everything back into the very first equation, step back, and let the learning flow:
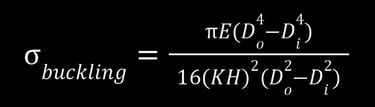
(5)
This equation represents the buckling stress of your cylinder. The larger the value, the more resistant the cylinder is to buckling. If we want a stronger cylinder, we can figure out ways to increase the numbers that are above the fraction line and decrease the numbers that are below.
Ways to increase E, the stiffness of clay material:
Use a stronger clay body, like a groggy stoneware instead of a fine porcelain
Start with drier, stiffer clay, though this will make wedging and centering more difficult
Throw faster to reduce the amount of time for water to become absorbed
Use less water while throwing
Remove water or slip from surfaces that you are not actively touching
After my cylinder is complete, before I begin shaping, I always use a wooden rib to remove all slip from the outer surface. While I'm shaping, pushing outward from the inside, I don't touch the outer surface, so I keep it dry to maintain strength
Ways to increase Do and Decrease Di:
This is pretty straight-forward
Increase the outer diameter of your cylinder
Decrease its inner diameter
Increase the thickness of your cylinder wall
Since the (Do - Di) term has a 4 exponent on top and a 2 exponent on bottom, that means the top will dominate and we can ignore the term on the bottom
Ways to decrease H:
This is also straightforward, a shorter cylinder will be more resistant to buckling
Ways to decrease K:
Remember when I said K was 2? It only starts at 2, assuming a perfect cylinder
In reality, any imperfections you create will increase K, so this is going to be the wildcard that is heavily dependent on your throwing technique and ability to pull clean cylinders
In modern manufacturing, engineers commonly use 2.1 to add some safety margin and account for manufacturing variations, so you can imagine how much higher this number can get when you compare hand-throwing vs machine manufacturing!
Here are the takeaways: if you are encountering buckling failures often, then you can remedy that by being a bit safer with Do, Di, and H. But since these three factors conflict with our aim of making taller, thinner cylinders, these are the factors we do want to push to their limits. In the end, it comes down to E and K – the stiffness of the clay material and throwing technique. And that's it!
I’m sorry, what? You already knew this and didn’t need to read through all that mathematical jargon? Well, too bad! You may have "known" it before, but now you know know it.
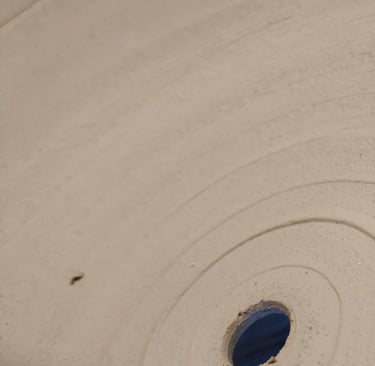
Or, did you enjoy that light summer reading and wish the fun continued? Well, then you're in for a treat. This entire post was about a cylinder buckling under its own weight, but it doesn’t take into account the other forces that are acting on the clay while you're throwing. Forces like the torsion and shear from your fingers as you are pulling the cylinder, the bending that occurs when you shape the curved walls, the interplay between friction and lubrication when using water and slip. So many fun topics to cover. But alas. You'll just have to wait until the next post. Until then, don't forget to enjoy the journey, touch some grass, or sometimes grow some grass out of your green ware like in my headline photo. See you again in Part 2!
This one is for my fellow potters who want to make larger pieces on the wheel. For those who enjoy pushing clay to its limits, in height, width, and thinness. For those who seek the challenge. We’re going to nerd out. Are you ready to nerd out?
For some time now, in my eternal quest to improve my cylinders, I have had thoughts swirling around in my head. Dark thoughts. Engineery thoughts. And I figured it was about time I organized everything into a long-winded post.
Throwing taller and larger mainly comes down to the quality of your cylinder, and part of understanding this is understanding what makes a cylinder strong, what makes it weak, what stresses it out, and how to minimize it. I’m going to walk through some basic structural mechanics of throwing larger cylinders. It will be technical, but hopefully approachable. If it's too much, you can always skip down to the takeaways.
Is this going to make you a better potter? Undoubtedly. You can always trust what you read on the internet. At a minimum, I hope this gives you a more nuanced appreciation for what goes into a large, beautiful vase: a high quality cylinder.
Let’s start with stress. Very relatable. We all have it and use pottery as a means to get rid of it. We take our stress out on the clay. Literally.
This is a simple equation for stress (σ). It's Force (F) divided by Area (A). Stress is also the same as pressure. For example, you might be familiar with pressure like PSI, which stands for Pounds per Square Inch. Pounds are a force, and they are being divided by square inches, an area. For you metric peoples, Newtons per square meters gives you Pascals (Pa).
And guess what? When a lump of wedged clay is placed on the wheel, F is just its own weight, pushing down on itself. It doesn’t move because it’s able to hold itself up. But then you start centering and apply additional force with your hands. When the pressure you apply is greater than the clay’s ability to resist, it will yield, deforming under the force of your hands.
From this equation, you can see that the larger the area you use to push, the greater the force required to produce the same stress. This is why when centering, it’s easier to move the clay using only the heel or edge of your palm, or sometimes your fingertips. A smaller applied area results in greater stress on the clay.
Let’s go deeper down the rabbit hole. Once the opening is complete and you start pulling your cylinder, things get a bit more complicated. Unlike during centering, imperfections are not easily eliminated. Any flaws or defects during this stage will almost certainly be permanent and cascading. These flaws could have come from many places: the clay out of the bag, the wedging process, the centering and opening, the cylinder pulling, a loose-fitting bat. Or even a mosquito biting you (this unfortunately happened to me just two weeks ago).
(1)
At the cylinder stage, the center has been hollowed out and the clay mass is now held up with thin walls. The force, or weight of the clay, has not changed, but the cross-sectional area holding it up has gotten much smaller, from a filled-out circle to a hollow, thin ring. This smaller area means more stress.
Some things to observe at this point: assuming each cylinder pull is perfect, the clay will still eventually stop rising with each pull. This is because the walls are no longer thick enough or strong enough to support the weight. It slumps down upon itself after it leaves your fingers. It has reached its limit and any further attempt is an exercise in futility.
Notice also that the bottom of the cylinder wall is thicker than the top. This is natural, because the bottom of the wall needs the larger area to hold up the larger weight of clay above it. The clay near the top of the wall supports much less weight, so it will be thinner as a result. The picture below illustrates the difference in cross-sectional area between centered lump, cylinder bottom, and cylinder top. If you have a cylinder whose walls are the same thickness from top to bottom, that’s telling you that the clay has not yet reached its limit.
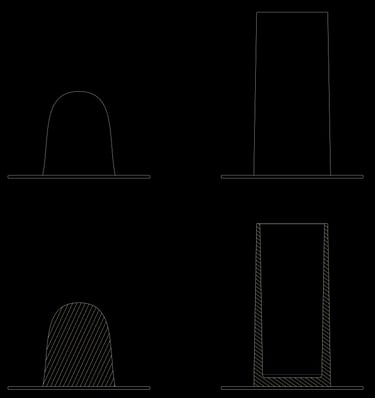
The ideals: centered hump, perfect cylinder
Comparing cross-section areas
Of course, this is all assuming a cylinder without imperfections or defects. In reality, you are a flawed, mortal human, and will you impart your human flaws into your cylinder. These imperfections – areas that are thinner, wetter, or off-center – will increase the risk of buckling as you throw.
Buckling is a sudden, uneven, and usually catastrophic deformation that occurs in thin-walled structures. Think of crushing a soda can or shoving your feet into shoes without using your hands. It buckles at the weakest point, resulting in a crumpled heap. A perfect cylinder will yield and slump under its own perfectly centered weight, but an imperfect cylinder will buckle, folding upon itself. And you know what? There’s an equation for that. It’s the same as before, but the force F changes to something called Euler’s buckling load. Let’s call it Fbuckling.
(2)
where:
E is the stiffness of the clay material, not related to its shape
I is the stiffness of the clay shape, not related to its material
K is the effective height factor of the cylinder, which is 2 for our purposes
H is the height of the cylinder
For simple thin-walled cylinders, we have the following equations:
where:
Do is the outer diameter of the cylinder
Di is the inner diameter of the cylinder
(3)
(4)
Now, let’s plug everything back into the very first equation, step back, and let the learning flow:
(5)
This equation represents the buckling stress of your cylinder. The larger the value, the more resistant the cylinder is to buckling. If we want a stronger cylinder, we can figure out ways to increase the numbers that are above the fraction line and decrease the numbers that are below.
Ways to increase E, the stiffness of clay material:
Use a stronger clay body, like a groggy stoneware instead of a fine porcelain
Start with drier, stiffer clay, though this will make wedging and centering more difficult
Throw faster to reduce the amount of time for water to become absorbed
Use less water while throwing
Remove water or slip from surfaces that you are not actively touching
After my cylinder is complete, before I begin shaping, I always use a wooden rib to remove all slip from the outer surface. While I'm shaping, pushing outward from the inside, I don't touch the outer surface, so I keep it dry to maintain strength
Ways to increase Do and Decrease Di:
This is pretty straight-forward
Increase the outer diameter of your cylinder
Decrease its inner diameter
Increase the thickness of your cylinder wall
Since the (Do - Di) term has a 4 exponent on top and a 2 exponent on bottom, that means the top will dominate and we can ignore the term on the bottom
Ways to decrease H:
This is also straightforward, a shorter cylinder will be more resistant to buckling
Ways to decrease K:
Remember when I said K was 2? It only starts at 2, assuming a perfect cylinder
In reality, any imperfections you create will increase K, so this is going to be the wildcard that is heavily dependent on your throwing technique and ability to pull clean cylinders
In modern manufacturing, engineers commonly use 2.1 to add some safety margin and account for manufacturing variations, so you can imagine how much higher this number can get when you compare hand-throwing vs machine manufacturing!
Here are the takeaways: if you are encountering buckling failures often, then you can remedy that by being a bit safer with Do, Di, and H. But since these three factors conflict with our aim of making taller, thinner cylinders, these are the factors we do want to push to their limits. In the end, it comes down to E and K – the stiffness of the clay material and throwing technique. And that's it!
I’m sorry, what? You already knew this and didn’t need to read through all that mathematical jargon? Well, too bad! You may have "known" it before, but now you know know it.
Or, did you enjoy that light summer reading and wish the fun continued? Well, then you're in for a treat. This entire post was about a cylinder buckling under its own weight, but it doesn’t take into account the other forces that are acting on the clay while you're throwing. Forces like the torsion and shear from your fingers as you are pulling the cylinder, the bending that occurs when you shape the curved walls, the interplay between friction and lubrication when using water and slip.
So many fun topics to cover. But alas. You'll just have to wait until the next one. Until then, don't forget to enjoy the journey, touch some grass, or sometimes grow some grass out of your green ware like in my headline photo. See you again soon.
Thanks for visiting
Let me know if you have any questions
Contact
Updates
kokeiceramics@duck.com
© 2025. All rights reserved.